
Want to install Proxmox on your Raspberry Pi fast and hassle-free? Follow this easy step-by-step tutorial to see how to install Proxmox on your Raspberry Pi in 7 minutes! Beginner or expert, follow along and have your Raspberry Pi up and running Proxmox for effective virtualization. Let’s start!
Turn Your Old Laptop or PC Into a Monitoring Server Using Observium – Step-by-Step Guide
Before installing Proxmox on the Raspberry Pi, we have to update the package list and upgrade any older packages. Use the following two commands in the terminal to accomplish this task.
sudp apt update
sudo apt upgrade
Next we need set the root password using below commands
sudo passwd rootOutput will show like below:
New password:
Retype new password:
Then ensure that curl is installed on your Raspberry Pi. Curl is needed to download the GPG key necessary for accessing the Proxmox Ports repository. Install it using the following terminal command.
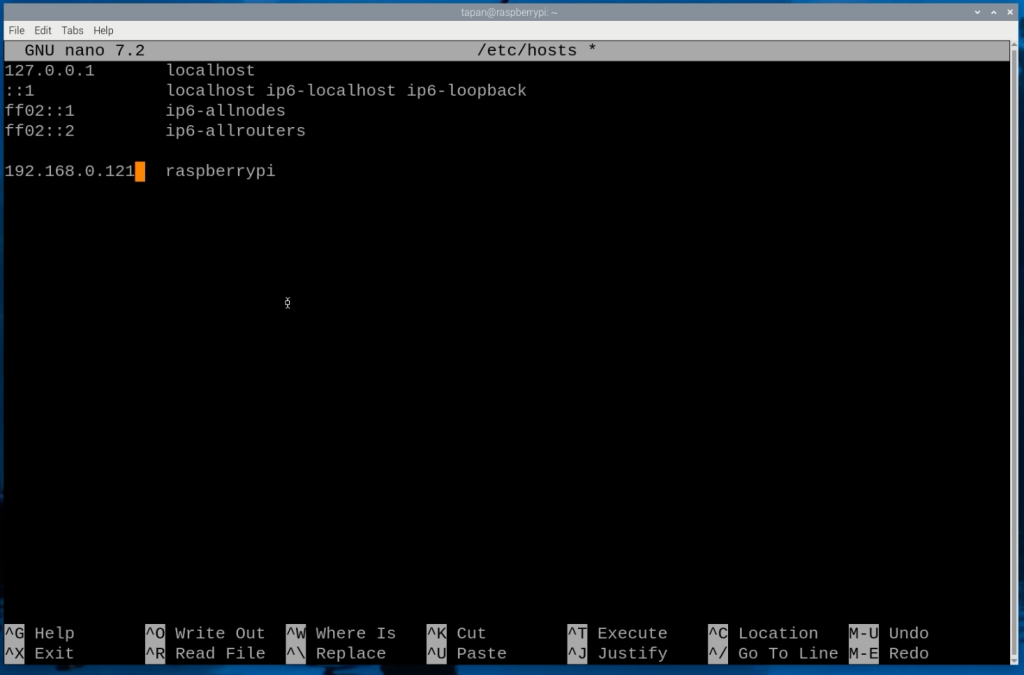
sudo apt install curlAfter you’ve set up a static IP address, the second step is to modify the hosts file. Proxmox needs the hostname to be associated with your Raspberry Pi’s IP address. To modify the hosts file, open it in the nano text editor with the following command:
sudo nano /etc/hostsFind the below line:
127.0.0.1 raspberrypiUpdate with your IP Address:
192.168.0.121 raspberrypimodify the hosts file
Now that we’ve come to the installation phase, it’s now time to include the Proxmox Ports repository in your Raspberry Pi. This third-party repository offers Proxmox versions fine-tuned for Raspberry Pi hardware.
The initial step is to include the GPG key, which verifies the packages from the Proxmox Ports repository as authentic.
curl -L https://mirrors.apqa.cn/proxmox/debian/pveport.gpg | sudo tee /usr/share/keyrings/pveport.gpg >/dev/nullNow that the GPG key is installed, the next thing to do is to add the Proxmox repository to the sources list. Use the following command to save the repository link in a file called “pveport.list”.
echo "deb [arch=arm64 signed-by=/usr/share/keyrings/pveport.gpg] https://mirrors.apqa.cn/proxmox/debian/pve bookworm port" | sudo tee /etc/apt/sources.list.d/pveport.listAfter modifying the sources list, it’s essential to update the package list cache to recognize the newly added Proxmox repository. Run the following command to refresh the package manager and ensure it detects the latest updates.
sudo apt updateNow that we have everything ready, it’s time to begin installing Proxmox on your Raspberry Pi. The first package we must install is ifupdown2, which Proxmox depends on for network configuration management.
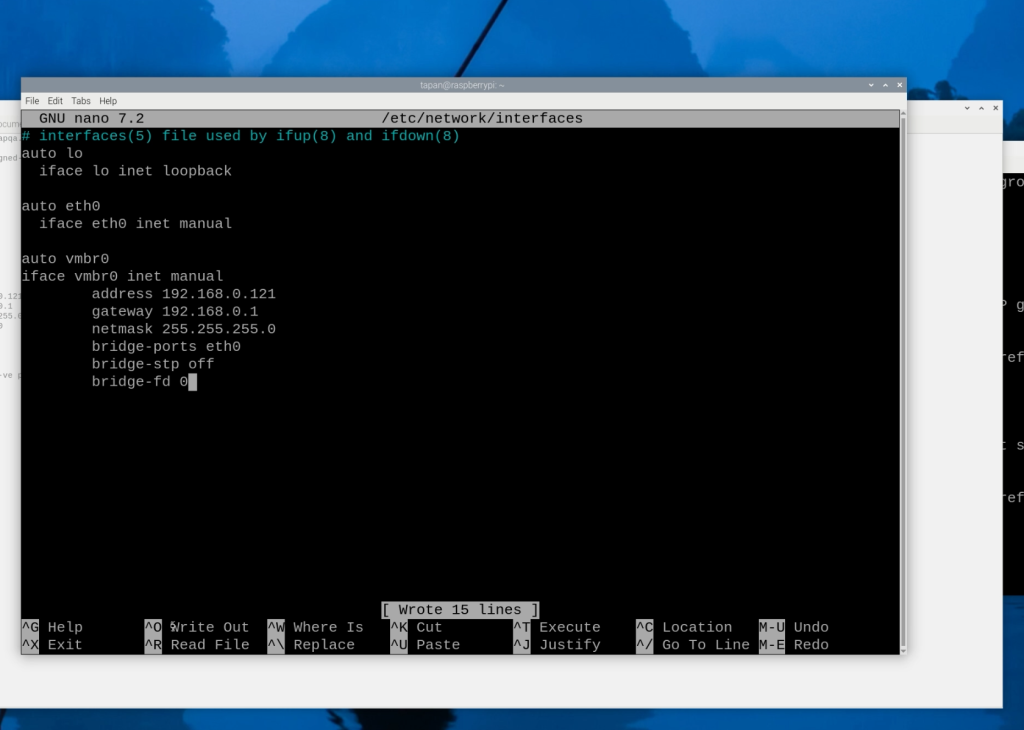
sudo apt install ifupdown2Next, we must update the interfaces file so that Proxmox will function as expected after a reboot. If these are not made, Proxmox will not run correctly.
We will bring the eth0 interface in by hand and add a new network bridge for your virtual machine networks.
In order to start editing this file, use the following command:
sudo nano /etc/network/interfacesIn the interfaces file, scroll to the end and insert the following lines. If any of these interfaces are already defined, remove them and insert the values listed here.
When editing, make sure to replace two placeholders:
IPADDRESS: Put in here your Raspberry Pi’s local IP address. This is the IP it uses to join the network.
GATEWAY: Substitute this with your gateway’s IP address, which is typically your router’s IP (often 192.168.0.1).
auto lo
  iface lo inet loopback

auto eth0
  iface eth0 inet manual

auto vmbr0
iface vmbr0 inet manual
        address YOUR-IPADDRESS>
        gateway YOUR-GATEWAY
        netmask 255.255.255.0
        bridge-ports eth0
        bridge-stp off
        bridge-fd 0
Now you can install Proxmox VE and required packages by using the following command in the terminal.
The process will take some minutes, so be patient. You will also face some prompts in the course of the process which you’ll have to answer.
sudo apt install proxmox-ve postfix open-iscsi pve-edk2-firmware-aarch64At this stage of the tutorial, you should have installed Proxmox VE on your Raspberry Pi successfully.
Proxmox allows you to create and manage virtual machines on your Pi with ease, making it a great tool for virtualization fans.
In case you face any problems during the setup of Proxmox on your device, you can leave a comment below, and we will assist you in troubleshooting.
If you enjoyed this tutorial, we also suggest checking out our other tutorials for additional tips and information.
